
How to Cook Mushrooms Properly: Techniques, Common Mistakes, and the Science Behind Perfect Results
From beautifully browned fresh mushrooms to deeply flavorful dried varieties, mastering a few fundamental techniques can transform one of the kitchen’s most versatile ingredients.
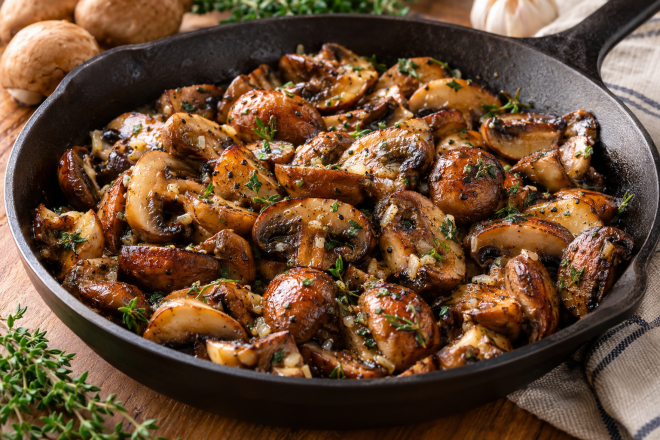
Mushrooms seem simple enough to cook. Slice them, toss them into a skillet with some butter, and sauté until tender. Yet anyone who has tried to reproduce the deeply browned, intensely savory mushrooms served in a good restaurant knows that the results can be surprisingly inconsistent.
Sometimes mushrooms turn golden and develop a wonderful, almost meaty texture. Other times, they release a pool of liquid, shrink dramatically, and become pale, limp, or rubbery.
The difference isn’t necessarily the variety of mushroom, the quality of the butter, or even the recipe. Often, it’s the way the mushrooms are prepared, how moisture is managed, and what happens during the first few minutes of cooking.
Understanding how heat, moisture, pan selection, and preparation affect mushrooms makes it possible to produce consistently better results.
These techniques apply to everything from everyday button mushrooms to shiitakes, oyster mushrooms, and dried porcini.
Contents
Understanding mushrooms
Understanding mushrooms before cooking them
Fresh mushrooms contain approximately 80–90 percent water, depending on the variety. That high moisture content explains much of their behavior in a skillet.
When mushrooms heat up, their internal moisture begins moving toward the surface. As that water evaporates, the mushrooms lose volume and their flavors become more concentrated.
However, the water must evaporate before the surface can become hot enough to brown effectively.
This is why a crowded skillet often produces steamed mushrooms rather than sautéed ones.
The goal isn’t necessarily to prevent mushrooms from releasing moisture. It’s to control what happens to that moisture and give the mushrooms an opportunity to develop flavor afterward.
Choose the right mushroom for the job
Different mushrooms offer different flavors, textures, and cooking characteristics.
White button mushrooms: Mild, economical, and versatile. Excellent for learning proper sautéing techniques and for recipes where mushrooms support other ingredients.
Cremini mushrooms: Firmer and more flavorful than white buttons. Particularly good for steak accompaniments, gravies, and mushroom sauces.
Portobello mushrooms: Mature cremini mushrooms with broad caps and substantial texture. Excellent for grilling, roasting, and preparing as a main-course centerpiece.
Shiitake mushrooms: Rich, earthy, and intensely savory. Their caps brown beautifully, while their tough stems are generally better reserved for stock.
Oyster mushrooms: Delicate, with irregular edges that become wonderfully crisp when properly sautéed. They benefit from minimal handling.
King oyster mushrooms: Dense and substantial, with thick stems that can be sliced into medallions and seared until golden.
Dried porcini and shiitake: Particularly useful when a dish needs concentrated mushroom flavor. They require rehydration and careful handling before cooking.
Cook’s tip: When preparing mushrooms as a side dish, try combining cremini and shiitake mushrooms. The cremini provide a satisfying texture, while the shiitakes contribute a deeper savory character.
Preparing mushrooms and choosing a pan
Cleaning mushrooms without waterlogging them
One of the most persistent kitchen myths is that mushrooms should never be washed because they absorb enormous amounts of water.
Mushrooms can absorb some additional moisture, particularly when submerged for extended periods, but a quick rinse is generally harmless.
The more important issue is removing excess surface water before browning.
How to clean fresh mushrooms
- Inspect the mushrooms and remove any damaged, slimy, or discolored portions. Discard mushrooms showing signs of spoilage.
- For relatively clean mushrooms, remove loose dirt with a soft brush or dry towel.
- If the mushrooms are noticeably dirty, rinse them briefly under cool running water.
- Drain immediately. Avoid leaving them submerged unnecessarily.
- Spread the mushrooms on a clean kitchen towel or absorbent paper towels.
- Pat thoroughly dry, paying particular attention to the underside of the caps.
- Allow them to air-dry briefly if additional surface moisture remains.
Important: Never wash mushrooms with soap or detergent.
When to cut the mushrooms
For the best appearance and texture, cut mushrooms shortly before cooking.
Slice larger cremini or button mushrooms approximately 1/4 to 1/2 inch thick. Thicker slices retain a meatier texture, while thinner slices cook more quickly and become more delicate.
Small mushrooms can be halved or quartered.
Oyster mushrooms are often better torn into natural clusters rather than sliced into uniform pieces.
King oyster mushrooms can be cut into thick rounds and lightly scored to encourage attractive browning.
The important consideration is consistency: pieces of similar size cook at approximately the same rate.
Choosing the right pan
The cooking vessel matters because it determines how efficiently heat reaches the mushrooms and how easily moisture can evaporate.
A broad skillet with a heavy base is generally preferable to a narrow saucepan.
Cast iron
An excellent choice for achieving deep browning.
Cast iron retains heat well and provides a substantial cooking surface. Once properly preheated, it can produce an excellent crust on larger mushroom pieces.
However, cast iron also retains heat after the burner is reduced, so careful temperature control is important.
Carbon steel
Another excellent choice, especially for sautéing.
Carbon steel responds somewhat more quickly to temperature adjustments than heavy cast iron and is particularly useful for cooking mushrooms in batches.
Stainless steel
A versatile option that makes it easier to observe the development of browned residue, or fond, on the bottom of the pan.
That fond can later be dissolved with stock, wine, or another flavorful liquid to create a pan sauce.
Nonstick
Convenient for everyday cooking and particularly useful for delicate mushrooms.
Nonstick skillets can brown mushrooms, although they should not be subjected to temperatures beyond the manufacturer’s recommendations.
Our preference: For deeply browned mushrooms, use a well-seasoned cast-iron skillet or a heavy stainless-steel sauté pan.
Cooking fresh mushrooms
Manage the water before adding fat
Mushrooms do not always need to begin cooking in butter or oil.
A dry skillet can be used to encourage mushrooms to release their moisture before fat is introduced.
This method is especially effective with ordinary button and cremini mushrooms.
Step-by-step: dry-sautéing mushrooms
For approximately 1 pound of fresh mushrooms
- Clean and dry the mushrooms, then cut them into evenly sized pieces.
- Place a broad skillet over medium to medium-high heat.
- Add the mushrooms directly to the dry skillet without butter or oil.
- Spread them into a relatively even layer. Work in batches if necessary.
- Allow the mushrooms to heat, stirring occasionally to prevent localized scorching.
- As the mushrooms cook, they will begin releasing moisture. Depending on the mushrooms and pan, this may appear as droplets or a noticeable pool of liquid.
- Continue cooking until the released moisture has largely evaporated.
- Once the pan is nearly dry and the mushrooms begin sizzling rather than steaming, add approximately 1 tablespoon of neutral oil.
- Spread the mushrooms out again and allow them to brown, turning as needed.
- Add 1 tablespoon of unsalted butter during the final minute or two for flavor.
- Season with salt and freshly ground black pepper.
- Remove from the heat when the mushrooms are tender and attractively browned.
Approximate cooking time: 10–18 minutes, depending on the mushroom variety, thickness, quantity, and skillet.
Why this works
The initial cooking period helps release and evaporate moisture without requiring the mushrooms to brown immediately.
Once the surface becomes drier, the addition of oil encourages better contact between the mushrooms and the hot pan.
Butter is introduced toward the end, when its flavor can complement the mushrooms without exposing its milk solids to prolonged high heat.
This method is particularly useful when cooking a relatively large quantity of mushrooms.
An important distinction: Dry-sautéing is an effective technique, not a universal requirement. Mushrooms can also brown beautifully when started in oil, provided the pan is sufficiently hot and moisture can escape.
Let the mushrooms brown without constant stirring
Many home cooks stir mushrooms almost continuously.
While stirring prevents scorching and encourages even cooking, excessive movement can interfere with the development of a golden crust.
Browning requires sustained contact between the mushroom surface and the hot skillet.
Step-by-step: direct sautéing
This method is particularly suitable for shiitakes, oyster mushrooms, and thick mushroom slices.
- Preheat a heavy skillet over medium-high heat.
- Add enough neutral oil to lightly coat the bottom of the pan.
- Arrange the mushrooms in a single layer.
- Leave them undisturbed for approximately 2–3 minutes, or until the undersides begin developing a golden crust.
- Turn the mushrooms and continue cooking until the opposite sides are browned.
- Reduce the heat if the mushrooms begin scorching before becoming tender.
- Add a small amount of butter, if desired, during the final minute.
- Season and serve immediately.
Avoid pressing down excessively on delicate mushrooms. A gentle press may improve contact for larger, firmer pieces, but aggressive compression can damage their structure.
The sound of the pan
Pay attention to what you hear.
A gentle hiss accompanied by visible liquid generally indicates that moisture is evaporating.
A more pronounced sizzling sound, once excess water has disappeared, often indicates that the mushrooms are frying and beginning to brown.
If the pan becomes completely dry and the mushrooms begin sticking or scorching, reduce the heat and add a little fat.
Learning to recognize these changes is more reliable than following a rigid cooking time.
Why crowding the pan causes problems
Imagine placing a pound of sliced mushrooms into a small skillet.
As the mushrooms heat, they release moisture. Because the pan has limited surface area, the liquid accumulates faster than it evaporates.
The temperature of the wet mushroom surfaces remains limited by the presence of water, and browning is delayed.
This does not necessarily ruin the mushrooms, but it changes the cooking process.
How to prevent crowding
- Use a 12-inch skillet when preparing approximately 1 pound of mushrooms, and cook in batches if needed.
- Spread mushrooms into a single layer whenever browning is the goal.
- Allow visible liquid to evaporate before attempting to develop a deep crust.
- Transfer browned batches to a warm plate rather than stacking uncooked mushrooms on top of them.
A useful exception: When making mushroom soup, gravy, or a braised dish, extensive initial browning may not be necessary. In those preparations, allowing the mushrooms to release moisture together can be perfectly appropriate.
Salt: before, during, or after cooking?
Salt affects the movement of moisture in mushrooms, but its timing is less critical than pan temperature and evaporation.
Salting mushrooms early can encourage moisture to appear at the surface. That may be useful during a moisture-release stage.
However, if the goal is immediate browning in a lightly oiled skillet, salting toward the end is a convenient way to keep the initial cooking process focused on surface contact and evaporation.
Our recommended approach
For dry-sautéed mushrooms: Add salt after most of the released moisture has evaporated, unless deliberately using salt to help draw moisture out.
For directly sautéed mushrooms: Season after the first side has developed some color, or during the final minutes of cooking.
For mushroom sauces and gravies: Season gradually, remembering that reducing liquid concentrates saltiness.
The amount of salt should reflect the intended use of the mushrooms, particularly when they will later be combined with salted stock, cheese, or another seasoned ingredient.
Working with dried mushrooms
Rehydrating dried mushrooms correctly
Dried mushrooms are not simply fresh mushrooms with their water removed. Drying changes their texture and can intensify or alter their aroma and savory character.
Dried shiitakes and porcini are particularly useful for soups, stocks, sauces, risotto, and other dishes where concentrated mushroom flavor is desirable.
Proper rehydration allows dried mushrooms sufficient time to regain moisture and develop a more pleasant texture.
Slow, cold-water rehydration
This is an excellent method when time permits, especially for dried shiitakes.
- Inspect the dried mushrooms and remove any obvious debris.
- Place approximately 1 ounce of dried mushrooms in a clean container.
- Add approximately 2 cups of cold water, or enough to keep the mushrooms submerged.
- Place a small plate or other food-safe weight over the mushrooms if they float.
- Cover and refrigerate for approximately 6–12 hours, or until thoroughly softened. Particularly thick shiitakes may require longer.
- Remove the mushrooms from the liquid.
- Gently squeeze out excess moisture without crushing them.
- Trim away any tough stems.
- Slice or cut the rehydrated mushrooms according to the intended recipe.
The soaking liquid contains valuable flavor and should not automatically be discarded.
Faster warm-water method
When time is limited:
- Place the dried mushrooms in a heatproof bowl.
- Cover with warm water, approximately 120–140°F.
- Allow to soak for 20–40 minutes, or until fully softened.
- Remove, drain, and trim as necessary.
- Strain the soaking liquid before using it in cooking.
Thicker mushrooms may need additional time.
Which method is better?
Cold rehydration is useful for preserving a delicate flavor profile and producing an evenly hydrated texture. Warm-water rehydration is faster and entirely suitable for many everyday recipes.
Neither approach is automatically superior for every mushroom or dish.
Never waste the mushroom soaking liquid
The liquid left behind after rehydrating dried mushrooms can contain substantial amounts of dissolved flavor compounds.
It can be an excellent addition to:
- Mushroom gravy
- Beef and mushroom sauces
- Risotto
- Vegetable stock
- Braised meats
- Creamy mushroom soup
- Pan sauces for steak or pork
However, dried mushrooms can contain grit, and their soaking liquid may carry sediment.
How to prepare mushroom soaking liquid
- Carefully lift the rehydrated mushrooms from their container.
- Allow the liquid to stand briefly so heavier sediment can settle.
- Pour the liquid slowly through a fine-mesh strainer lined with a coffee filter or suitable fine filter.
- Stop pouring before the gritty sediment at the bottom reaches the strainer.
- Bring the strained liquid to a simmer and cook it thoroughly before incorporating it into a finished dish.
- Taste before adding salt or reducing further.
Cook’s note: Mushroom soaking liquid can be concentrated by simmering it gently. Use the resulting reduction sparingly at first, since its flavor may become quite intense.
Rehydrate dried mushrooms in the refrigerator for extended soaks, and refrigerate any soaking liquid that will not be used promptly.
Cooking rehydrated mushrooms
Rehydrated mushrooms contain moisture again, but they do not behave exactly like fresh mushrooms.
Their structure has been altered by drying, and they may have a firmer or chewier texture.
For the best results:
- Drain the mushrooms thoroughly.
- Gently squeeze out excess soaking liquid.
- Pat dry with a clean towel.
- Cut into evenly sized pieces.
- Heat a small amount of oil in a skillet over medium heat.
- Add the mushrooms and cook until any remaining surface moisture evaporates.
- Continue sautéing until the edges develop some color.
- Add butter, aromatics, or seasonings as appropriate.
- If necessary, add a little strained soaking liquid and simmer until the mushrooms reach the desired tenderness.
Dried shiitakes are especially well suited to simmered preparations, while rehydrated porcini can contribute remarkable flavor to sauces.
Building flavor
Building flavor without overpowering the mushrooms
Properly cooked mushrooms already have considerable flavor. Additional ingredients should enhance that character rather than conceal it.
Butter: Add during the final stages of cooking to provide richness and a rounded flavor.
Garlic: Add finely minced garlic during the last 30–60 seconds of sautéing. Garlic added too early may burn before the mushrooms finish cooking.
Shallots: Finely minced shallots can be cooked in a little butter after the mushrooms have browned. Their mild sweetness complements earthy mushroom flavors.
Thyme: Fresh thyme is especially effective with cremini, shiitake, and portobello mushrooms.
Soy Sauce: A small amount of Japanese soy sauce can reinforce the mushrooms’ savory character. Begin with approximately 1/2 teaspoon per pound of mushrooms, taste, and adjust carefully.
Dry Sherry or White Wine: A small splash can loosen browned fond from the skillet and provide acidity. Allow the liquid to reduce before serving.
Lemon Juice: A few drops added at the end can brighten a rich mushroom preparation without making it noticeably sour.
Our favorite finishing combination: Unsalted butter, a small amount of minced shallot, fresh thyme, freshly ground black pepper, and a restrained splash of dry sherry.
Golden-brown butter-sautéed mushrooms
Golden-brown butter-sautéed mushrooms recipe
Deeply browned cremini mushrooms finished with butter, shallots, garlic, and fresh thyme. A splash of dry sherry adds complexity, while a little lemon juice provides balance. This versatile preparation makes an excellent side dish for steaks, roasted meats, and poultry.
Recipe at a glance
Servings: 4
Prep Time: 10 minutes
Cook Time: 15–20 minutes
Total Time: 25–30 minutes
Difficulty: Level 2 Easy
Cost: Level 2 Economical
Cooking difficulty: Level 2 — Easy
Recipe cost: Level 2 — Economical
Ingredients
- 1 pound cremini mushrooms, cleaned and quartered or thickly sliced
- 1 tablespoon neutral cooking oil
- 2 tablespoons unsalted butter, divided
- 1 small shallot, finely minced
- 2 cloves garlic, finely minced
- 1 teaspoon fresh thyme leaves
- 1 tablespoon dry sherry, optional
- 1/2 teaspoon kosher salt, or to taste
- 1/4 teaspoon freshly ground black pepper
- 1 teaspoon fresh lemon juice, optional
Instructions
- Clean the mushrooms and dry thoroughly. Cut into evenly sized pieces.
- Place a large, heavy skillet over medium to medium-high heat.
- Add the mushrooms to the dry skillet in a single layer, working in batches if necessary.
- Cook, stirring occasionally, until the mushrooms release moisture and most of that moisture evaporates, approximately 5–8 minutes.
- Add the neutral oil and spread the mushrooms evenly across the skillet.
- Allow the mushrooms to brown for approximately 2–3 minutes before turning. Continue cooking until attractively browned on multiple sides.
- Reduce the heat to medium. Add 1 tablespoon of butter and the minced shallot.
- Cook for approximately 1 minute, stirring gently.
- Add the garlic and thyme. Cook for another 30–60 seconds, until fragrant.
- If using sherry, add it to the skillet and scrape up any flavorful browned residue. Allow the liquid to reduce until nearly evaporated.
- Add the remaining tablespoon of butter, salt, and black pepper.
- Toss gently until the mushrooms are evenly coated and glossy.
- Add the lemon juice, if desired, and taste for seasoning.
- Serve immediately while hot.
Cook’s notes
For deeper mushroom flavor: Replace approximately 1/4 pound of the cremini with fresh shiitake caps.
For a richer finish: Add a teaspoon of crème fraîche after removing the skillet from the heat.
For steakhouse-style mushrooms: Omit the lemon juice and add a little additional butter with a few drops of Worcestershire sauce.
For a Japanese-inspired variation: Omit the sherry and thyme. Finish with a small amount of soy sauce, unsalted butter, and finely sliced scallions.
For a crispier result: Use slightly less butter, avoid overcrowding, and allow the mushrooms additional undisturbed contact with the skillet.
Serving suggestions
Serve hot as a side dish with steak, roasted meat, or poultry. Spoon the mushrooms onto the plate just before serving to preserve their browned texture.
Beverage suggestions
A dry Pinot Noir or a lightly oaked Chardonnay complements the earthy mushrooms and butter. For a nonalcoholic option, serve sparkling water with a slice of lemon.
Troubleshooting and storage
Troubleshooting common mushroom problems
| Problem | Likely cause | Solution |
|---|---|---|
| Pale, watery mushrooms | Excess moisture or overcrowding | Use a wider pan and allow liquid to evaporate |
| Burned edges, raw centers | Excessive heat or uneven pieces | Reduce heat and cut more consistently |
| Mushrooms sticking | Insufficient fat during browning or premature turning | Allow a crust to develop and add oil when needed |
| Greasy mushrooms | Too much fat, especially early in cooking | Begin with less oil and add butter near the end |
| Rubbery texture | Incomplete cooking, thick pieces, or naturally firm varieties | Adjust thickness and cooking time |
| Bitter flavor | Burned garlic, butter solids, or mushroom residue | Add aromatics later and reduce heat |
| Weak mushroom flavor | Insufficient browning or excess liquid | Concentrate moisture and develop more color |
Food safety and storage
Fresh mushrooms are perishable and should be handled with the same care as other fresh produce.
Store uncooked mushrooms in the refrigerator in packaging that permits some air circulation, such as a paper bag. Avoid trapping excessive condensation.
Cooked mushrooms should be refrigerated promptly in shallow, covered containers and used within approximately 3–4 days.
Reheat in a skillet over medium heat until thoroughly hot, adding a small amount of butter or oil if needed.
For best quality, avoid repeatedly cooling and reheating the same batch.
Dried mushrooms should be stored in airtight containers in a cool, dry location. Discard any showing mold, unexpected moisture, or signs of deterioration.
Only use mushrooms obtained from reliable food sources. Never assume that an unidentified wild mushroom is edible.
Key lessons from our kitchen
The most important lessons
Mastering mushrooms is less about memorizing a recipe and more about understanding a few fundamental principles.
Moisture controls browning. Mushrooms must lose sufficient surface water before a deep crust can develop.
Pan size matters. A broad skillet allows moisture to escape and provides room for direct contact with the cooking surface.
Fat has a purpose. Oil encourages browning, while butter adds richness and flavor. They do not always need to be added at the same time.
Movement matters. Stir enough to prevent burning, but allow sufficient undisturbed contact for browning.
Dried mushrooms deserve special treatment. Proper rehydration, careful straining of soaking liquid, and appropriate cooking techniques help make the most of their concentrated flavor.
The best method depends on the dish. Mushrooms intended for a crisp, golden side dish require different treatment from mushrooms destined for a creamy soup or slow-cooked sauce.
A final thought from our kitchen
There’s something particularly satisfying about discovering that an everyday ingredient still has something to teach us.
Mushrooms are a perfect example.
We can cook them hundreds of times and still find room for improvement simply by changing when we add the butter, how long we leave them undisturbed, or how carefully we manage the moisture in the pan.
The lesson isn’t that every mushroom must be prepared the same way. It’s that understanding the ingredient gives us the freedom to choose the right technique for the result we want.
And that’s what makes cooking interesting.
A better mushroom dish doesn’t necessarily begin with a better recipe. It begins with a better understanding of the mushroom.
Related recipe
Golden-Brown Butter-Sautéed Mushrooms with Shallots, Garlic & Thyme


Leave a Reply